
This article demonstrates using the ItemList Node in both Godot 2 and Godot 3. The ItemList node in Godot 3 has the ability to display the items in columns, but in this illustration we’re just doing a basic single column list.
Using the ItemList Node
Using the ItemList Node is the same in both Godot 3 and Godot 2. In this example the ItemList node is loaded with the list components using code, and a button is used to take the selected item and display it in a label.

Download the demonstration projects from here:
- Godot2 Version: G2ItemListDemo.zip
- Godot 3 Version: G3ItemListTest.zip
Scene Setup
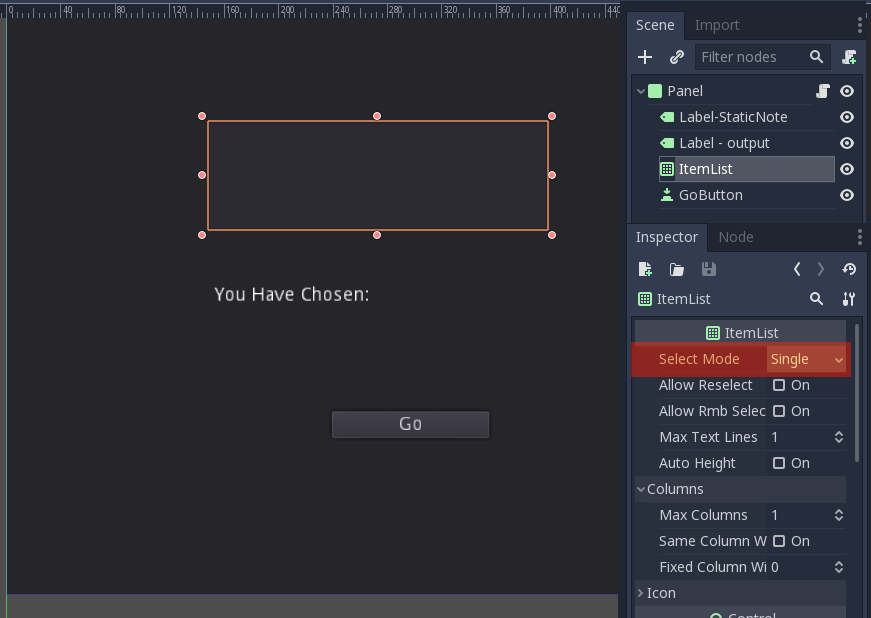
The two examples differ slightly only in the Godot 3 version having an extra label with static text. Other than that they are the same.
 Godot 2 version of the ItemList demonstration scene.
Godot 3 version of the ItemList demonstration scene.
The scene is comprised of;
- a Panel for the root node,
- a Button node (Renamed “GoButton”),
- in the case of the Godot 2 example; a Label node. In the case of the Godot 3 examples it has the two Label nodes (called “Label-StaticNote” and “Label - output”),
- and the ItemList node.
The Godot 3 ItemList has been set to “Single” which means only one item from the list can be selected. The alternative would allow multiple items to be selected.
The Panel, and the Labels are all using the default settings with the only changes being the Panel’s Size which is set to match the project’s window size (640x480) and the Label-StaticNote Text field which contains the phrase “You have Chosen:”
Similarly the Button is just a default button with the only change being the addition of “Go” to the Text field.
The Script
In order to make it all work, a script is required. This loads the items into the ItemList node and controls the query to the ItemList node when the button is pressed.
Attached to the Panel node is the following script:
extends Panel

var ItemListContent = ["We shall go this way","We shall go that way","which way shall we go?","I think we're lost"]

func _ready():
	#Load the ItemList by stepping through it and adding each item.
	for ItemID in range(4):
		get_node("ItemList").add_item(ItemListContent[ItemID],null,true)

	get_node("ItemList").select(0,true) #This sets a default so we don't have
	# to do error catching if an empty selection is captured.
	get_node("GoButton").connect("pressed",self,"ReportListItem")


func ReportListItem():
	var ItemNo = get_node("ItemList").get_selected_items()

	#The output ItemNo is a list of selected items.  Use this to select
	#The matching component from the associated array, ItemListContent.

	var SelectedItemtext = ItemListContent[ItemNo[0]]
	get_node("Label - output").set_text(str(SelectedItemtext))
	print(ItemNo)
The script for the Godot 2 version is identical except for the name of the Label node used for displaying the selected item’s text.
When the scene is run the ItemList node is loaded from the ItemListContent array. This is a done using a loop and the .add_item() method. To avoid problems with errors from empty selections, I have also set a default selection using the .select() method.
When the “GoButton” is pressed the script runs the “ReportListItem” function. This function gets the selected items from the ItemList node and returns the list of position value(s) of the selected item(s) in the list. We are only selecting one item so the list only has a single component. We use this to find the matching line of text in the ItemListContent array and use this to display in the Label. We also print the selected item array to the console.
It can be made a bit smarter with the application of Themes.
You can find an article on Spinboxes here: SpinBoxes in Godot3
and the article on OptionButton nodes in Godot 2 here: The OptionButton Node in Godot2
You can also find an article on exporting your project to Android and other platforms here: Godot: Exporting Projects to Android and Other Platforms