
Godot is a fantastic game engine for developing 2D and 3D games and then exporting them to a variety of platforms in a painless process. Exporting to Linux and Windows is extremely easy, Exporting to Macs is easy but I haven’t tested these outputs yet. Exporting to Android is a little more involved but once your system is set up, it is efficient and effective. This article describes what you need to export your Godot project to Android and the process to follow. Exporting to Linux and Windows is also described.
I am using Linux to develop my projects, but the process should be the same for Windows. I am also using Godot 2.1.5.
“Why use an old version of Godot?” I hear you ask. When Godot 3 first came out it had a lot of fantastic support for 3D games and many improvements for 2D games. In all ways it was better, but it also required a more modern computer capable of running OpenGL3.0 or greater. To maximise the ability for anyone to run anything I produce I was keen to ensure my work would run on older machines. This meant using the Godot 2.x series which is compatible with OpenGL ES 2.0 / OpenGL 2.1 machines.
Having just looked at the latest edition of Godot Game Engine which is Godot 3.1 and it has gone back to the OpenGL ES 2.0 / OpenGL 2.1 renderer. It looks like I might have to update: my work to the new Godot 3.1 now.
The method here is based on the process described by Jayanam on his video tutorial on exporting to Android from Godot 3 under a Windows system. https://www.youtube.com/watch?v=QPI8JsKF2j4
Tools Required
Export Templates (Standard)
To export to any platform you need the export templates issued by the Godot developers. You can find them on the same page as you downloaded Godot. This will give you a file called Godot_vXXXX-stable_export_Templates.tpz where XXXX is the Godot version number. See the examples below…
For Godot 2.1.5
https://downloads.tuxfamily.org/godotengine/2.1.5/

For Godot 3.1
https://godotengine.org/download/linux
https://godotengine.org/download/windows

Install these into Godot 2.1.5 using the following method.
- Load an existing project or start a new one so you are faced with the Godot editor interface.
- In the top right corner click on the Settings button.

- From the drop down select the Install Export Templates option.

- In the file Open a File dialogue navigate to where you have downloaded your
Godot_v2.1.5-stable_export_Templates.tpzfile and hit Open.
For Godot 3.1 the process is more or less the same but the locations of things is slightly different.
- Load an existing project or start a new one so you are faced with the Godot editor interface.
- In the top left menu bar click on the Editor button.

- From the drop down select the Manage Export Templates option.

- This will open a new window where you can either Download the latest Export template package directly, or Install From File.
- If you have already downloaded the
Godot_v3.1-stable_export_templates.tpzfile, click on the Install From File button to bring up a file dialogue.

- In the file Open a File dialogue navigate to where you have downloaded your
Godot_v3.1-stable_export_Templates.tpzfile and hit Open.
Godot will process the files and once that is done you have all you need to export to Windows, Linux, and Macs.
To export to Android you need a few other tools.
Android Studio

You can download Android Studio from here: https://developer.android.com/studio/
To install it, just follow the instructions here: https://developer.android.com/studio/install
The installation process is just unzipping the package somewhere meaningful, and then running a program studio.sh or studio.exe from the bin directory within the unzipped android_studio directory. The process of installing the rest of Android Studio is all guided from there.
For installing Android Studio on a Linux you will need to add a couple of extra libraries. The following is directly from the Android Studio installation instructions:
Required libraries for 64-bit machines:
If you are running a 64-bit version of Ubuntu, you need to install some 32-bit libraries with the following command:
sudo apt-get install libc6:i386 libncurses5:i386 libstdc++6:i386 lib32z1 libbz2-1.0:i386If you are running 64-bit Fedora, the command is:
sudo yum install zlib.i686 ncurses-libs.i686 bzip2-libs.i686
Java SE Development Kit
To obtain the Oracle Java Development Kit go to the following website:
https://www.oracle.com/technetwork/java/javase/downloads/jdk8-downloads-2133151.html

Accept the License Agreement and download the package appropriate to your system.
Installing the JDK is simply a matter of uncompressing the downloaded file somewhere meaningful where you can access it later through Godot.
Installing on Linux
Installing on Windows
Setting Up Godot to Export to Android
Once the packages listed above are installed, Godot needs to be directed where to look for them.
Start Godot and open an existing project or start a new one so you are faced with the editor screen again. The following is described for Godot 2.1.5 only. The process is the same for Godot 3.1 but the locations are different. Watch Jayanam’s video tutorial if you can’t find them. https://www.youtube.com/watch?v=QPI8JsKF2j4
- In the top right corner of the Godot 2.1.5 editor screen click on the Settings button.

-
Choose the Editor Settings option in the drop-down menu.
-
In the Editor Settings dialogue, click on the Android list item to bring up the Android export tools settings.

The items that need to be set are the Adb, the Jarsigner, and the Debug Keystore. These are all part of the Android Studio and Java development kit that you installed.
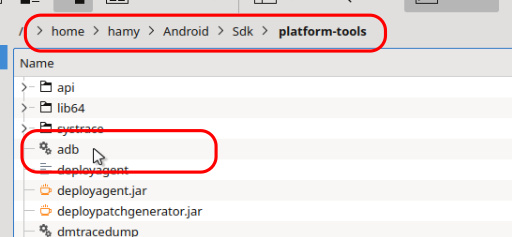
Adb
Click on the folder icon and navigate to the following directory;
Linux: /home/USER/Android/Sdk/platform-tools/ and click on the adb file.
Windows: USERPROFILE\AppData\Local\Android\sdk\platform-tools\ and click on the adb file. Note: This is as described on Jayanam’s video tutorial. Seeing as I am not running Windows machines I can’t verify this folder location.
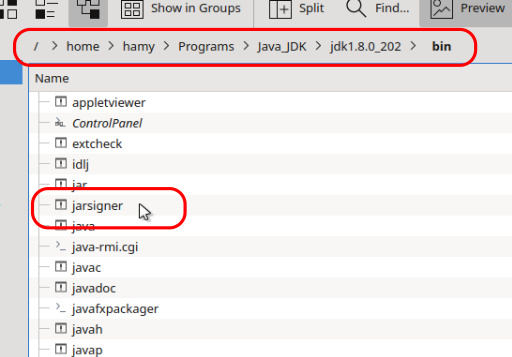
Jarsigner
Click on the folder icon and navigate to the directory you installed the Java JDK to. In my case I created the directory Java_JDK under a Programs directory in my home directory. Within this directory look for the bin directory. You will be looking at a path something like this;
Where-ever_I_uncompressed_the_JDK_package/jdk1.8.0_202/bin
or in my case:
/home/hamy/Programs/Java_JDK/jdk1.8.0_202/bin
Click on the jarsigner file and accept it.
Debug.keystore
The debug.keystore may have been generated by Android Studio, but it may also need to be generated by you. First look to see if it exists. With your file browser, allow it to show hidden files, and navigate to the .android directory under your home directory. Look for the file debug.keystore. If it isn’t there you will need to get the keytool in the Java Development Kit to generate it.
To generate the debug.keystore open a terminal in the jdk1.8.0_202/bin directory (the same one where you found the jarsigner file.)
Copy and paste in the following command.
keytool -genkey -v -keystore %HOMEPATH%/.android/debug.keystore -alias androiddebugkey -storepass android -keypass android -keyalg RSA -keysize 2048 -validity 10000 -dname "CN=Android Debug,O=Android,C=US"
Please don’t ask me what it all means; I just got it off Jayanam’s video tutorial. Change %HOMEPATH% to whatever path will get you to your home directory.
Now you will find the debug.keystore file has been generated in the .android directory.

Because this is in the hidden directories you may not be able to access it through Godot’s file browser. Just key in the path and filename into the Debug Keystore line in the Editor Android Settings. The entry will look something like this on a Linux machine:
/home/USER/.android/debug.keystore
Exporting a Project to Android
We are now at the stage where we have all the tools we need to export to Android, Linux, Windows, and Mac (and a few other platforms besides). Exporting is a relatively straight forward process.
Step 1 – Load your Godot Game
You need to load your project into Godot and be in the editor window to access the Export dialogue.
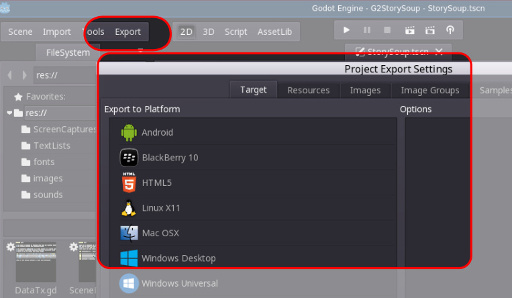
Step 2 – Go to the Export Window
In the top left hand menu you will find the Export button. Clicking on this will open the Export Settings dialogue.
Step 3 – Resources
The Godot exporter recognises the common file formats typically associated with a game project and automatically gathers them up from your project directory and bundles them out as a separate resources package or incorporated into the executable produced. If you have resources that are not image files, audio files, etc, then you will need to direct the Godot exporter to include these in the package. For instance, in the application I have made there are .txt files which are critical to the application. By default the Godot exporter does not recognise these as being worth including. By going to the Resources tab within the Project Export Settings dialogue I can define what file formats to include (or exclude). In the example below *.txt has been added to “filters to export non-resource files” input line.
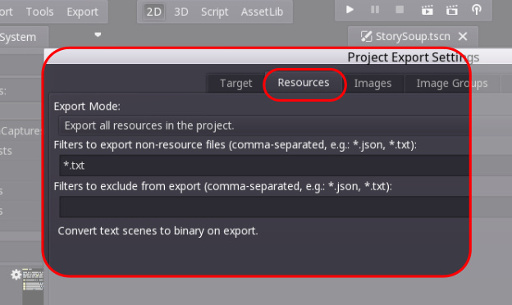
If you find your exported project hangs or crashes, a worthwhile check is to see if you are missing any resources in the exported package.
Step 4 – Exporting to Android
Returning to the Target tab click on the Android item in the list. On the right panel will appear all the settings for the Android export.

Chances are you won’t have to do anything to any of these settings, but if you need access to various hardware on the Android device you may want to visit the list at the bottom of the export options. Another option worth considering is the package icon if you have a customised one in your resources.
Once you are happy with your export options, hit the Export button at the bottom of the dialogue.
This will create an .apk file with your application ready to run on an Android device.
Step 5 – Loading onto Android
Transfer the .apk package to you Android Device’s Downloads folder using whatever your favourite method is for getting files onto the device.
Once it has appeared in the Downloads folder. Touch on it and call up your application installer. It may complain about not recognising the vendor and do you really trust this person etc. Just accept things and it will install your application.
Exporting a Project to Other Platforms
The process is much the same for other platforms. Follow steps 1 – 3 above and then select the platform you want to export to for step 4.
Exporting to Linux and Windows


The options for exporting to both Linux and Windows are quite simple.
You can choose between a 32-bit and 64-bit output and three different options for packaging the resources.
The packaging options are:
- Pack into binary file (
.pck) - Pack into archive file (
.zip) - Pack into executable
With the .pck and .zip options a separate file containing the resources will be built to accompany the exported executable.

If you have several projects you are working on it will pay to export each project to separate output directories. It appears the exported executable will pick up whichever resources .zip or .pck it finds first and attempt to use it even if it is not one that belongs to it.
Packing the resources into the executable produces a single executable file containing the project and the resources. For small projects this is very convenient. I am unsure how this effects the performance of larger resource-heavy projects.

So that’s it. In my (limited) experience, Godot has the most pain-free multi-platform deployment method I have ever come across. It certainly beats trying to deploy python scripts and pygame applications.
Hopefully this will be useful. I also hope I have not missed any other dependencies that may be required for other Linux distros.
Other Godot Articles
Find out about the Godot Item List Node here: The ItemList Node in Godot
The Godot 2 OptionButton nodes here: The OptionButton Node in Godot2
and Godot3 Spinboxes here: SpinBoxes in Godot3